genuine original laptop screens
authentic oem parts
authentic oem parts
809 screen replacement videos
watch now
watch now
All screens are brand new
Every order ships same day
SELECT THE iPAD MODEL YOU NEED A REPLACEMENT SCREEN FOR
iPad 4
4th Generation
w/ Retina display
Nov 2012 - Now
4th Generation
w/ Retina display
Nov 2012 - Now
iPad 3
3rd Generation
The New iPad
March 2012 - Oct 2012
3rd Generation
The New iPad
March 2012 - Oct 2012
How to find your iPAD version
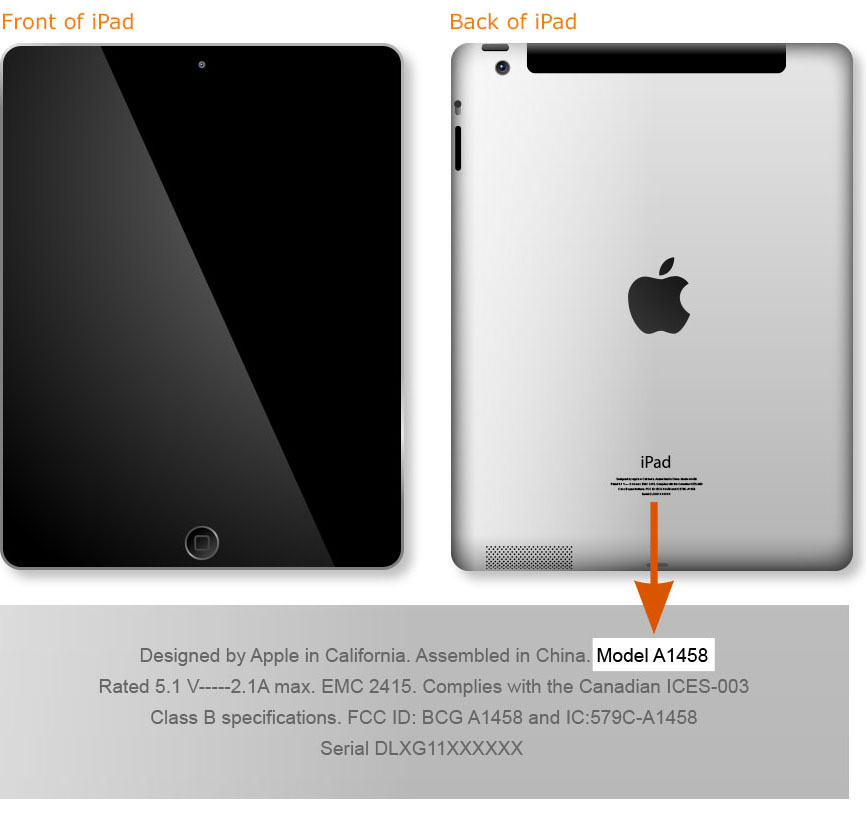
The most reliable way to find out which model of iPad you have is to look at the model number on the back of your iPad.
iPad 4 with Retina display
iPad 4 Wi-Fi: Model A1458
iPad 4 Wi-Fi Cellular: Model A1459
iPad 4 Wi-Fi Cellular: Model A1460
iPad 4 Wi-Fi: Model A1458
iPad 4 Wi-Fi Cellular: Model A1459
iPad 4 Wi-Fi Cellular: Model A1460

iPad Mini
iPad Mini Wi-Fi CDMA: Model A1455
iPad Mini Wi-Fi GSM: Model A1454
iPad Mini Wi-Fi: Model A1432
iPad Mini Wi-Fi CDMA: Model A1455
iPad Mini Wi-Fi GSM: Model A1454
iPad Mini Wi-Fi: Model A1432

iPad 3
iPad 3 LTE: Models A1430 & A1403
iPad 3 Wi-Fi: Model A1416
iPad 3 LTE: Models A1430 & A1403
iPad 3 Wi-Fi: Model A1416

iPad 2
iPad 2 Wi-Fi CDMA: Model A1397
iPad 2 Wi-Fi GSM: Model A1396
iPad 2 Wi-Fi: Model A1395
iPad 2 Wi-Fi CDMA: Model A1397
iPad 2 Wi-Fi GSM: Model A1396
iPad 2 Wi-Fi: Model A1395

iPad 1 (First Generation)
iPad Wi-Fi: Model A1219
iPad Wi-Fi 3G: Model A1337
iPad Wi-Fi: Model A1219
iPad Wi-Fi 3G: Model A1337

iPAD Screen Explained
"iPad Screen Explained" - a must read article for every broken-screen-iPad owner.
All iPad LCD screens and glass digitizers sold at LaptopScreen.com are replacement-ready modules pre-assembled at the factory.
Please note that Glass Digitizer and LCD screen do not come as one piece, thus you will need to buy them separately.
Please have a look at the diagram below, which depicts typical elements of every iPad screen model to date (January 2013). Two major distinct components are the front assembly and the LCD screen itself.
iPad's front assembly
The front assembly consists of a transparent top layer glass digitizer (1), which is basically printed onto the glass pane. The information about users' touch input is transmitted to the logic board via the iPad's digitizer connector (5).
The LCD screen is connected to the iPad's case itself via mounting tabs (4).
Some other important components of the front assembly are the ambient light sensor window (2), front-facing video camera window (3) and the home button cut out (6).
iPad's LCD screen
The LCD screen (9) used in iPads is based on the same technology found on laptops - Liquid Crystal Display, and the backlight is provided by a series of LEDs - Light Emitting Diodes (7). The screen is connected to the logic board via its own connector (8).

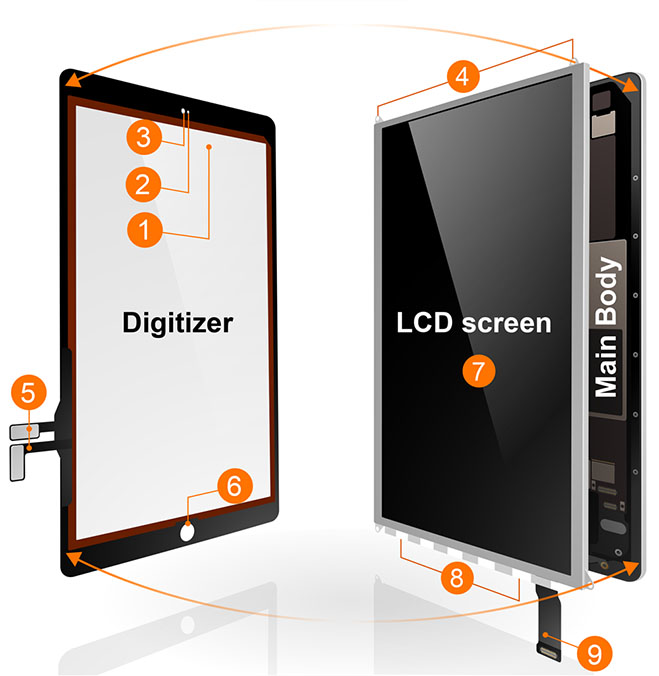
1 - Transparent top layer glass digitizer. The glass digitizer is a pane of glass with semi-transparent conducting elements arranged in a grid, with an attached controller. The controller interprets the position of the finger on the grid via variance in capacity, which occurs when the finger is on the touch screen - and that is why iPad touch screens are referred to as capacitive. One more neat thing to note about capacitive touch screen technology (as opposed to resistive) is that it allows for interpretation of multiple touches at the same time - which is why it is also called multi-touch.
2 - Ambient light sensor window. Ambient light sensor is responsible for auto-brightness, proximity detection.
3 - Front-facing camera window.
4 - LCD mounting tabs (2 of 4).
5 - Digitizer connector to the main board (logic board).
6 - Home button cut out.
7 - LEDs for back-light (3 of 18).
8 - LCD connector to the main board.
9 - LCD panel (screen itself).
Installation guide foriPAD MiniiPAD 3iPAD 2iPAD 1
iPAD Mini LCD Screen and Glass Digitizer installation guide
Please watch the following video (highly recommended), or follow the step by step instructions below:
This guide will show you how to install your iPad Mini LCD screen and front glass digitizer.
1. The first thing you'll need to do is to turn off the iPad Mini. The device can be powered down by holding the power button on the top and then confirming the shut-down on the screen.
2. The front glass, which is the touch sensitive digitizer, is glued on. Removal of the digitizer will require some heating prior to opening.
For the installation process, you will need the following tools:
-heat gun or hair dryer
-plastic picks
-flat metal tool, such as a putty knife
-small phillips screwdriver
-metal pick
It is also recommended that you use a suction cup for keeping the aluminum edges ding–free.
For the installation process, you will need the following tools:
-heat gun or hair dryer
-plastic picks
-flat metal tool, such as a putty knife
-small phillips screwdriver
-metal pick
It is also recommended that you use a suction cup for keeping the aluminum edges ding–free.
3. Using the heat gun, warm up the glue on the edges of the front glass. Be consistent, ensuring that the heat is evenly distributed. If heat is applied to one spot for too long, further damage or cracking to the glass or LCD screen may occur.
4. Once the edges of the front glass have been properly warmed up, place a suction cup at the top left corner. Gently pull up on the suction cup. Doing so will expose the left edge of the digitizer enough to be able to insert a putty knife between the digitizer glass and the LCD underneath
5. Work your way around the top edge, using the putty knife to separate the digitizer from the frame. It is advised to keep applying heat from the heat gun in order to keep the glue warm.
6. After some amount of separation has occurred, place plastic strips between the front glass and the LCD so that the glue does not adhere again. It is also useful to use a plastic pick to keep the glass panel open. It is not advised to use a screwdriver in place of the plastic strips or pick—unless your glass is already broken—as further damage to the glass may occur.
7. With the top edge separated, you can now use your fingers to pull up the touch sensitive digitizer glass. Leverage the bottom edge of the glass. Continue with the separation process by applying heat using the heat gun on the left, bottom and right edges. Keep the heat gun moving, taking care not to leave the heat in one spot for too long.
8. Lift up the digitizer glass, but do not separate it from the bottom, as it is still connected.
9. Now we will proceed to remove the LCD panel. If your digitizer is still intact, and you will simply be replacing the original one again, hold it at no more than a 90 degree angle to the surface. If the digitizer is broken and you will be replacing it with a new one, it is not necessary to hold it up.
10. There are 4 LCD screws which will need to be removed. There is one LCD screw in each corner. The final one is obstructed by foaming insulation.
11. Using the putty knife, gently lift the LCD screen from the top, while keeping the bottom edge down.
12. A metal separator plate is secured with 16 tiny screws—8 on each side—which will need to be removed. Start by removing the 8 identical screws from the left side, followed by 2 larger screws and then the 6 tiny screws on the right side.
13. The metal separator plate can now be removed.
14. With the metal separator plate removed, you'll see there is another smaller one under it. This smaller metal separator plate will need to be removed in order to disconnect the LCD screen and the digitizer. Remove the 3 screws from the metal separator plate.
15. Above where the metal separator plate was located, you will see there is an LCD connector, which will need to be picked open.
16. The digitizer's connector is located underneath. You can now pick open that one as well.
17. Lay down the LCD screen and you will see that it is connected via 2 pieces of black tape. Using a pick or a flat-head screwdriver, gently remove these pieces of tape, which are holding the LCD in place.
18. There is a control circuit that is glued in. You will need to remove it with a pick or flat-head screwdriver.
19. After the control circuit has been removed, you can set the glass digitizer aside.
20. The iPad Mini can now be reassembled using a new or original LCD screen and digitizer.
21. Align the glass digitizer with the bottom edge of the iPad mini, guiding it in to position and re-connecting it to the logic board.
22. Re-connect the LCD screen to the logic board, aligning it with the bottom edge.
23. Gently place the LCD screen down and re-apply the mounting tape.
24. Lift up the LCD screen. Replace the small metal separator plate using the 3 screws.
25. The large metal separator can now be replaced. Put in the 2 larger screws first.
26. Next, the 14 tiny screws can be replaced.
27. The LCD screen can now be placed down on top of the metal separator. Replace the 4 screws—1 located in each corner.
28. If you needed to replace the glass digitizer or LCD screen with new ones, you will need to remove the protective film at this point. Use a dry, lint-free cloth to remove any dirt, smudges or fingerprints from both the LCD screen and the glass digitizer.
29. After you have ensured that all surfaces are clean, place the digitizer on top of the LCD screen, checking that it is properly aligned.
30. Use the heat gun to warm the adhesive on the edges of the iPad Mini.
31. Then, using a paper towel, gently shift the digitizer back in place.
32. The process is now complete, and you can turn on the iPad Mini!
iPAD 3 LCD Screen and Glass Digitizer installation guide
Please watch the following video (highly recommended), or follow the step by step instructions below:
This is a guide on replacing an LCD screen and glass digitizer on an Apple iPad 3.
1. There are a few things to note prior to starting the replacement procedure. The digitizer is a solid pane of glass that has been glued on to the main body with adhesive around the perimeter.
2. Make note of the Wi-Fi antenna, which is glued on to the digitizer. It is important that the antenna stay with the main body during separation of the digitizer.
3. As you will need to separate the digitizer from the main body, we recommend using a heat gun or hair dryer. You will also need both a philips and a flat screwdriver, as well as a wide metal tool such as a putty knife.
4. The first thing you'll need to do is to apply heat with the heat gun to the perimeter of the iPad 3. We are just warming up the working area with this process. Do not apply heat for longer than 1 minute, and be sure to keep the heat gun moving around the edge, so uneven heating does not occur.
5. Using your putty knife, make an insertion in the bottom right corner, between the glass and the plastic gasket. The gasket is in place to ensure there is no damage to the aluminium body. Unless the gasket is damaged, there is no need to remove it. You can leave it in place, as it will prevent nicks or dents.
6. Continue to apply heat to the right and bottom edges, using the putty knife for separation. Be sure not to insert the putty knife more than 1/4 inch under the digitizer.
7. When you have worked the putty knife around the right edge, it is recommended that you place pieces of plastic under the edge in order to prevent the adhesive from re-sticking.
8. Move on to the bottom edge, next. Apply heat evenly to the bottom edge, inserting the putty knife under the digitizer to continue separation. Be aware of the Wi-Fi antenna, which should separate on its own, if the heat is applied evenly and thoroughly. Once the bottom edge has been separated, add a piece of plastic to the left of the home button.
9. Next, use the heat gun and putty knife to separate the top edge. Put a piece of plastic to the right of the power button.
10. Using your fingers, gently apply upward pressure on the separated right edge. If there are any areas which are still glued, apply heat at this time. Now that the right, bottom and top edges are separated, lift the digitizer up at a right angle to the body. As we do not want to put too much strain on the connecting cable, it is not advised to lift the digitizer any more than needed.
11. Holding the digitizer at a 90 degree angle, remove the pieces of plastic from the outside edges.
12. Using a philips screwdriver, remove the 4 screws in the corners of the main body, which are holding the LCD screen in place. Use one hand to keep hold of the digitizer at no more than a right angle at all times.
13. Once the 4 LCD screws have been removed, you can gently lift the LCD screen and push it forward. Doing so will expose the digitizer's connector latches underneath.
14. Hold the LCD screen in one hand, so that you can work on the connectors below—while still making sure that the digitizer is held at no more than a right angle. Using a flat screwdriver, open the 3 connector latches that secure the digitizer and the video connector— which is located on the opposite side of where the cables plug in.
15. After that, disconnect the LCD screen and set it aside. There are two pieces of tape that need to be removed. The first is a small piece that is securing the cable to the connector. There is also a piece of tape securing the digitizer's cable, which will need to be removed. For this piece of tape, it may be helpful to use a flat screwdriver to slightly raise it, so it is easier to peel up.
16. Carefully lift the iPad 3 digitizer from the frame. Make sure that the cable is properly removed from the frame, prior to disconnecting.
17. The iPad 3 LCD screen and digitizer have now successfully been removed. Depending on what you are replacing—the LCD screen or the touchscreen digitizer—you can either install a new or the original digitizer at this point. If there is any protective film on the inside of the digitizer, make sure it is removed before installing it on the frame.
18. To install the digitizer, first slide the cable back in to the connector. It may be helpful to use a flat screwdriver to assist with sliding the cable back in place. To ensure proper positioning, check to see that both of the white lines on the cable are hidden by the connector.
19. Secure the connector latches and replace the black tape back on the connector.
20. Now that the digitizer is secured with the connecting cable, you can go ahead and install the LCD screen. Start by securing the connector latch, then replace the black tape.
21. The LCD screen will need to be propped up next, to make it easier to route the digitizer flex cable under the LCD cable.
22. With the LCD screen propped up, re-route the digitizer's cable back in place.
23. Hold the digitizer at a right angle. The LCD screen can now be slid back in to place.
24.The 4 LCD screws, located in each corner, can now be replaced.
25. As both the digitizer and the LCD screen are now in place, and we are nearing the end of the installation process, it is imperative to remove any dust, dirt, smudges or fingerprints that are on the LCD screen and the inside of the digitizer. Use a dry lint-free cloth, or a good paper-towel if you don't have a cloth on hand. Properly inspect the digitizer and the LCD screen by looking at the LCD screen through the digitizer, while not dropping it all the way down on top of the screen. It should be easy to spot any remaining grime or residue, due to the black surface of the screen.
26. After you have established that both the LCD screen and the inside of the digitizer are completely clean, you can then close the digitizer. Take care to align the digitizer properly with the plastic gasket.
27. With the digitizer in place, use the heat gun to apply even heat around the edges of the iPad 3 to warm up the glue and provide better adhesion.
28. The digitizer and LCD screen have now been replaced on the Apple iPad 3—you can now turn it on, and you're done!
iPAD 2 LCD Screen and Glass Digitizer installation guide
Please watch the following video (highly recommended), or follow the step by step instructions below:
iPad two digitizer is glued onto the main body, and prior to removing it, you must note a few danger zones,
which will require your special attention in order to open the device with the least damage caused.
It is very important to note, that the wireless antenna is glued to the glass, and needs to remain with the body, when the glass is separated.
Please make sure you are paying extra attention to that area when working through the glue.
As well as the volume and power buttons cable can be damaged in two spots. You should be extremely careful around those areas,
since breaking those cables will disable vital functions, and will require extra parts and time to repair.
This is a guide on reinstalling the front glass digitizer and the LCD display on the second generation Apple iPad.
There's plenty of adhesive in the iPad, and it helps knowing where it is located.
First there is the outer edge, where the plastic rim surrounding the glass meets with the aluminum groove.
Then there is the second ring of adhesive which bonds the glass to select parts of the body.
And last, there is a foamy dust shield around the LCD screen which also adheres to the actual glass.
As usual we are using the most basic tools such as a putty knife and a small philips screw driver.
However if you have access to a heat gun, or a hair dryer, you may consider using it to soften the adhesive around the edges.
The best place to start opening the iPad is the right bottom corner, just a few inches away from the wireless antenna.
Please note, even though the plastic lip is part of the digitizer assembly, we recommend inserting your putty knife between the glass and the plastic,
that way you can prevent leaving marks on the aluminum body. However you will not be able to reuse the original digitizer anymore.
In our case the digitizer is clearly broken, and we strongly caution users to not open their iPads unless they are actually broken.
that way you can prevent leaving marks on the aluminum body. However you will not be able to reuse the original digitizer anymore.
In our case the digitizer is clearly broken, and we strongly caution users to not open their iPads unless they are actually broken.
Gently work your way around the edges, moving from the right side to the left, going back and fourth on each edge, until full separation is achieved.
The adhesive is fairly strong, so please make sure you are positioning your knife in a controlled manner,
so that you are able to safely apply the force needed and are able to prevent damage from the knife.
Take extra care around the webcam area, and try to use fingers whenever possible.
The adhesive is fairly strong, so please make sure you are positioning your knife in a controlled manner,
so that you are able to safely apply the force needed and are able to prevent damage from the knife.
Take extra care around the webcam area, and try to use fingers whenever possible.
Once you have separated the right edge, make sure to separate the Wi-Fi antenna from the digitizer before proceeding any further.
Now that the antenna is secured it is safe to continue separating the glass away from the body. In cases when the digitizer is badly damaged,
it may have to come out in small pieces. Open the digitizer as far as you can, and proceed with removing the LCD screen.
It has to come out first so the digitizer can be disconnected.
it may have to come out in small pieces. Open the digitizer as far as you can, and proceed with removing the LCD screen.
It has to come out first so the digitizer can be disconnected.
Remove four phillips screws securing the LCD panel in place.
Then lift the LCD panel, and use a flat pick or a screw driver to open the video connector's bracket and to disconnect the screen. Place the screen aside.
Then, using the same pick, open the digitizer connector's latches, there are two of them on the opposite side of where the ribbon cable slides out.
It is very important to make sure that the latches are properly open, since forcefully removing the ribbon cable will most likely cause irreversible damage to the connector,
and the entire logic board will have to be replaced.
It is very important to make sure that the latches are properly open, since forcefully removing the ribbon cable will most likely cause irreversible damage to the connector,
and the entire logic board will have to be replaced.
Separate the old digitizer completely. In this case the digitizer is severely damaged, and we recommend cleaning up the remaining glass above a garbage bin,
since glass pieces are tiny and extremely sharp, it is best to contain them immediately.
Once you have cleaned up the main body of the remains of the original digitizer, everything can be put back together.
Reconnect the LCD display's video connector. Make sure the connector is plugged in all the way, and the bracket is closed properly with a screwdriver.
Slide the replacement glass underneath the LCD and reconnect the digitizer connector. Ensure that both connector latches are up before sliding the ribbon cable in.
Using a screwdriver guide the ribbon cable back in place and secure both latches.
Then flip the screen back into the original position
And secure the four Phillips screws.
In order to properly close and seal the digitizer, some preparation must be conducted.
We highly recommend that you ensure that there are no inward nicks or dents on the most outer rim of the body.
It is typical for the iPad to have some dents on the corners, and the original point of impact which broke the digitizer.
Use a screw driver and pliers or any other suitable tools to bend out all the imperfections,
so that the new digitizer can sit perfectly flush to the body.
To seal the digitizer we are using Scotch branded 3M double sided adhesive tape. You could use some other forms of adhesive like superglue,
but it is best to use something which can be opened for service afterwards. You must do your best to clean out as much of the old adhesive as possible.
Then cut your tape in appropriate width pieces. Strips of approximately 2 millimetres have to line the entire perimeter of the body in the outer groove.
Use your screwdriver to properly position the adhesive in the groove.
Then place appropriately sized pieces all around the second adhesive perimeter.
At this point you could close the digitizer. However we highly recommend that you carefully inspect the surface of the LCD display,
and remove any smudges, dirt, fingerprints, hairs, or anything else visible on the screen, since you would have to reopen the glass and reapply adhesive in order to clean up the screen.
Close the digitizer starting from the left edge, ensuring that the plastic rim is sitting flush to the groove.
It takes some patience to align the plastic rim and you could use an exact-o-knife to carefully shave off some plastic to properly sink it into the groove.
Once a proper alignment is achieved, apply weight on top of the iPad, and let it sit overnight for the adhesive to properly cure.
And you are done.
iPAD 1 LCD Screen and Glass Digitizer installation guide
Please watch the following video (highly recommended), or follow the step by step instructions below:
This is a guide to reinstalling an LCD screen and a digitizer on the Apple iPad.
When opening an iPad, it is important to know the positions of the aluminum locking tabs and plastic teeth which are part of the front assembly.
The green line represents where it is safe to open the iPad and the red line represents where it is not.
The best place to start opening the iPad is in the middle of the top edge.
The green line represents where it is safe to open the iPad and the red line represents where it is not.
The best place to start opening the iPad is in the middle of the top edge.
We recommend using a flat wide metal tool like a putty knife, which you can buy at any local hardware store.
Please do not use a screw driver, since it will leave visible damage on the aluminum edge.
Insert a corner of the putty knife between the rubber gasket and the aluminum edge and use it as a lever to start lifting the front assembly.
Please do not use a screw driver, since it will leave visible damage on the aluminum edge.
Insert a corner of the putty knife between the rubber gasket and the aluminum edge and use it as a lever to start lifting the front assembly.
Then move along the edge by repeating the same motion. Make sure you are placing your tool between the aluminum tabs.
As well you should not insert the putty knife deeper than half an inch to avoid any internal damage.
Please note, during this process you are very likely to break some of the aluminum tabs, which is ok,
since these are designed for single use, and our digitizer comes with a set of aluminum tabs pre-bolted on to it.
Once the front assembly is lifted along the three edges, do not separate it further than 3 inches away from the back cover.
At this point you need to disconnect the digitizer's locking connector. Please be extra cautious on this step, failure to
unlock the connector will most definitely cause permanent damage.
Pop open two plastic lips with a screw driver,
on the opposite side of where the ribbon cable slides in, then gently pull out the digitizer's ribbon cable.
unlock the connector will most definitely cause permanent damage.
Pop open two plastic lips with a screw driver,
on the opposite side of where the ribbon cable slides in, then gently pull out the digitizer's ribbon cable.
Once the ribbon cable is free, move to the ambient light sensor connector, pop it off with a screw driver. This connector is not as
sensitive, and is designed to disconnect fairly easy.
Then you can open the front assembly like a book, and move to the video connector. It's locked in place with a metal bracket which needs to be lifted away before pulling the video cable out. Once all the cables are disconnected, separate the back cover an put it aside.
Using a T4 Torx screw driver, remove 8 tiny screws securing the LCD screen in place.
Once all the screws are removed,
separate the plastic tape securing one edge of the screen.
Then using the putty knife carefully lift the LCD panel away from the front assembly.
The screen is glued in, so go slow and do not bend the panel excessively.
Go ahead and remove the ambient light sensor
which needs to be reused on the replacement digitizer.
At this point you can prepare your replacement for installation. Remove any packaging tape, and protective film from the inner glass.
Gently place the screen into the front assembly, then reinstall the ambient light sensor. Secure the previously taped edge with new tape. Then replace tiny torx screws along the perimeter of the LCD screen.
Now you can reconnect the front assembly to the back cover, starting with the video cable. Gently insert the connector in to the socket, and lock the metal bracket with a screw driver.
Insert the plastic teeth in the side of the aluminum back cover, then reconnect and lock the digitizer's cable.
Using a screw driver secure the ambient light sensor connection. Then make sure no cables are protruding.
At this point you can start snapping
the front assembly into the back cover. Start from the short edges, then move to the corners. Then you can remove the protective film from the front
glass. And you're done.
the front assembly into the back cover. Start from the short edges, then move to the corners. Then you can remove the protective film from the front
glass. And you're done.


